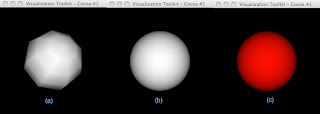
This post is going to explore the method for drawing shapes using vtk. Specifically a sphere. This builds upon the example of the cone by Gobbi. You should see the cone tutorial first, understand what it is doing, and then start on this tutorial. Three things will be introduced here.
- The vtkSphereSource class,
- Changing the way in which the sphere is created, and
- Changing the way in which the sphere is displayed.

#! /usr/bin/python
from vtk import *
# create a rendering window and renderer
ren = vtkRenderer()
renWin = vtkRenderWindow()
renWin.AddRenderer(ren)
renWin.SetSize(300,300)
renWin.StereoCapableWindowOn()
iren = vtkRenderWindowInteractor()
iren.SetRenderWindow(renWin)
# create the object to be drawn
sphere = vtkSphereSource()
sphere.SetRadius(8)
# Convert the sphere into polygons
sphereMapper = vtkPolyDataMapper()
sphereMapper.SetInput(sphere.GetOutput())
#Create an actor for the sphere
sphereActor = vtkActor()
sphereActor.SetMapper(sphereMapper)
# assign our actor to the renderer
ren.AddActor(sphereActor)
# enable user interface interactor
iren.Initialize()
iren.Start()
sphere.SetThetaResolution(30)
sphere.SetPhiResolution(30)
(sphereActor.GetProperty()).SetColor(1,0,0)
#! /usr/bin/python
from vtk import *
# create a rendering window and renderer
ren = vtkRenderer()
renWin = vtkRenderWindow()
renWin.AddRenderer(ren)
renWin.SetSize(300,300)
renWin.StereoCapableWindowOn()
iren = vtkRenderWindowInteractor()
iren.SetRenderWindow(renWin)
# create the object to be drawn
sphere = vtkSphereSource()
sphere.SetRadius(8)
sphere.SetThetaResolution(30)
sphere.SetPhiResolution(30)
# Convert the sphere into polygons
sphereMapper = vtkPolyDataMapper()
sphereMapper.SetInput(sphere.GetOutput())
#Create an actor for the sphere
sphereActor = vtkActor()
sphereActor.SetMapper(sphereMapper)
(sphereActor.GetProperty()).SetColor(1,0,0)
# assign our actor to the renderer
ren.AddActor(sphereActor)
# enable user interface interactor
iren.Initialize()
iren.Start()
0 comments:
Post a Comment