The BCC lattice

The reason why I especially posted this is to show how mathematics can be seamlessly converted into a program. This program generates a periodic lattice. Although the output of this program might seem similar to that shown in a couple of posts prior, this is more closely related to the physics. Methods of translating the mathematical formulation into Python, is shown below.

The Lattice:
A lattice is defined by a set of points given by p(n1,n2,n3) = n1*a+ n2*a2 + n3*a3.
Here, the three vectors are three unit vectors (not necessarily orthogonal), and the numbers are integer indices to the vectors. The function 'lattice_points(N)' returns a bunch of these integers (n1,n2,n3), such that we may be able to map atoms to these points. 

The Basis:
To each lattice point, a number of atoms are attached, displaced by a certain amount from the lattice point. For example, the BCC lattice has a basis of 2. In the program, the function 'unit_vectors_BCC(distance)' provides the position of the basis atoms relative to a particular point. Notice that the way in which a basis point is defined, one no longer needs to separately define unit vectors. These are defined here. However, they may easily be defined separately for greater modularity. And will probably be necessary in structures that are not cubic. 

The Crystal as a Whole:
For finding the location of each of the position of the atoms within a lattice, one just needs to add all of the basis atoms in each of the lattice sites. This is done in the function 'atom_locations(basis, lattice)'.

Once the atom locations are known, it is just a matter of displaying the spheres.

The result is shown below, for a BCC lattice:


The program is shown below:

######################################
# This program is used for calculating
# the bravis lattice points of a unit
# cell, and displaying the results in
# 3D. 
#
# Note that, since the mathematics of
# the bravis lattices are so uniform,
# it is relatively easy to calculate
# the positions of the positions of 
# all atoms, given a particular basis
######################################


##### Functions for doing the physics ##########

#-----------------------------------------------
# This function iterates over all lattice points
# and produces a list of 3D lattice points
#
# Input: 
#    N - the number of points in each dimension
# Output:
#    a [3 by (N+1)^3] matrix containing all
# the lattice points. Thus, for N = 1, returned
# points are,
# [[0,0,0], [0,0,1], [0,1,0], [0,1,1], [1,0,0], 
#  [1,0,1], [1,1,0], [1,1,1]]
#-----------------------------------------------
def lattice_points(N):
lattice = []
for i in range(N+1):
for j in range(N+1):
for k in range(N+1):
lattice.append([i, j, k])
lattice.append([i,j,k])
return lattice
#----------------------------------------------
# This function returns the unit vectors in the 
# three different directions, for each of the 
# basis atoms. This function is generally so 
# simple that in most situatons, it may be 
# defined by hand. Maybe a class is in order?
#
# Shown below is the unit vectors for a BCC 
# lattice, with lattice size 'distance'.
# Notice that BCC has 2 atoms in its unit cell.
# Thus you only provide only 2 atoms. 
#----------------------------------------------
def unit_vectors_BCC(distance):
a = distance; 
point1 = [a, a, a]
point2 = [a/2, a/2, a/2]
return [point1, point2]

#----------------------------------------------
# This function returns a list of coordinates
# for each basis, given the basis, and the 
# lattice points. 
#----------------------------------------------
def atom_locations(basis, lattice):
# Atom definitions
atom1 = []
atom2 = []
# Basis vectors
a1, a2, a3 = basis[0]
b1, b2, b3 = basis[1]
print a1, a2, a3
print b1, b2, b3
for n1, n2, n3 in lattice:
atom1.append( [n1*a1, n2*a2, n3*a3] )
atom2.append( [n1*a1 + b1, n2*a2 + b2, n3*a3 + b3] )
return [atom1, atom2]
#############################################################
#   At this point, we have all the atom locations. All that 
# remains to do is to draw them
#############################################################
from vtk import *

# create a rendering window and renderer
ren = vtkRenderer()
renWin = vtkRenderWindow()
renWin.AddRenderer(ren)
renWin.SetSize(300,300)
renWin.StereoCapableWindowOn()

iren = vtkRenderWindowInteractor()
iren.SetRenderWindow(renWin)


lattice_size = 10e-10; #meters
atom1_radius = 4e-10#meters
atom2_radius = 4e-10#meters


latticePoints = lattice_points(2)
a1, a2 = atom_locations(unit_vectors_BCC(lattice_size), latticePoints)

# Create the spheres ...
for a, b in zip(a1, a2):
##### This is for atom 1 ################
# create the object to be drawn
sphere = vtkSphereSource()
sphere.SetRadius(atom1_radius)
sphere.SetThetaResolution(30)
sphere.SetPhiResolution(30)
sphere.SetCenter(a[0], a[1], a[2])

# Convert the sphere into polygons
sphereMapper = vtkPolyDataMapper()
sphereMapper.SetInput(sphere.GetOutput())

#Create an actor for the sphere 
sphereActor = vtkActor()
sphereActor.SetMapper(sphereMapper)
(sphereActor.GetProperty()).SetColor(1,0,0)

# assign our actor to the renderer
ren.AddActor(sphereActor)

##### This is for atom 2 ################
# create the object to be drawn
sphere = vtkSphereSource()
sphere.SetRadius(atom2_radius)
sphere.SetThetaResolution(30)
sphere.SetPhiResolution(30)
sphere.SetCenter(b[0], b[1], b[2])

# Convert the sphere into polygons
sphereMapper = vtkPolyDataMapper()
sphereMapper.SetInput(sphere.GetOutput())

#Create an actor for the sphere 
sphereActor = vtkActor()
sphereActor.SetMapper(sphereMapper)
(sphereActor.GetProperty()).SetColor(0,0,1)
(sphereActor.GetProperty()).SetOpacity(1)

# assign our actor to the renderer
ren.AddActor(sphereActor)

# enable user interface interactor
iren.Initialize()

iren.Start()

A Lifesaver called MacPorts

In this article, I shall outline the convenience of installing MacPorts. If you haven't already, install it immediately.

You are welcome!

Now, lets see how we can use it. For installing a particular package, say the latest version of python, you need to do the following steps.

  1. Go to the MacPorts site, and go to the 'available ports' page.
  2. Type python into the search box. You will get everything that is remotely associated with python. The latest stable version (3/17/2010) is Python 2.6.4. Look for that package. It will be listed as python26, along with all its dependencies. 
  3. To install it, open the Terminal, and  type in the words,
    sudo install python26
  4. Type in your password (not the root password, your password).
  5. Sit back, and enjoy as ports checks dependencies, and installs everything that is required for the installation of python 2.6.4.
Now, however, you are stuck with two installations of python. The older version that came with the Mac, located at /usr/bin/python2.6, and the newer one found at /opt/local/bin/python2.6. However, note that if you directly type python at the terminal, you will still end up running the older version of python. Thats because, if you try to find the location of python (type which python in the Terminal), which happens to be a link to /usr/bin/python2.6. Thus, to use the MacPorts version, there are two options. 

  1. Execute it directly - type the whole path /opt/local/bin/python2.6.
  2. Update .bash_profile to modify your path to
    PATH=/opt/local/bin:/opt/local/sbin:$PATH.
Now, if we already have one version of python, why do we need another version? Because, if you are a scientist or an engineer, and want to install scipy, the conventional method just wont work. So, what do you do? Install scipy via MacPorts. and do your simulations using the new version. 

Finally, install mayavi. Which I am doing right now, while writing this article. 

The water molecule

This shows the method of making the water molecule. The molecule is is shown in the figure below.


Note that the method of adding objects is very repetitive. As a result, all of the repetitive code may be put into a general function that will do all that is required for making the molecule. The code is provided below. As usual, it builds upon the previous code.


#! /usr/bin/python
from vtk import *
from math import cos, sin
pi = 3.141592

###### Functions for making objects ################

#---------------------------------------------
# Make a sphere of a certain radius, position
# and color. This will represent an atom.
#---------------------------------------------
def makeSphere(radius, position, color):
# create the object to be drawn
sphere = vtkSphereSource()
sphere.SetRadius( radius )
sphere.SetThetaResolution(30)
sphere.SetPhiResolution(30)
sphere.SetCenter(position[0], position[1], position[2])
# Convert the sphere into polygons
sphereMapper = vtkPolyDataMapper()
sphereMapper.SetInput(sphere.GetOutput())

#Create an actor for the sphere 
sphereActor = vtkActor()
sphereActor.SetMapper(sphereMapper)
(sphereActor.GetProperty()).SetColor(color[0], color[1], color[2])
return sphereActor

#---------------------------------------------
# Make a cylinder of a certain radius, position
# orientation and color. This will represent an
# atom.
#---------------------------------------------
def makeCylinder(radius, height, position, color, rotation):
# create the object to be drawn
cylinder = vtkCylinderSource()
cylinder.SetRadius(radius)
cylinder.SetHeight(height)
cylinder.SetResolution(30)
cylinder.SetCenter(position[0], position[1], position[2])
# Convert the sphere into polygons
cylinderMapper = vtkPolyDataMapper()
cylinderMapper.SetInput(cylinder.GetOutput())

#Create an actor for the sphere 
cylinderActor = vtkActor()
cylinderActor.SetMapper(cylinderMapper)
(cylinderActor.GetProperty()).SetColor(color[0], color[1], color[2])
cylinderActor.RotateX(rotation[0])
cylinderActor.RotateY(rotation[1])
cylinderActor.RotateZ(rotation[2])
return cylinderActor


###### The Main Program Starts Here ################

# create a rendering window and renderer
ren = vtkRenderer()
renWin = vtkRenderWindow()
renWin.AddRenderer(ren)
renWin.SetSize(300,300)
renWin.StereoCapableWindowOn()

iren = vtkRenderWindowInteractor()
iren.SetRenderWindow(renWin)

x_ox = 0; y_ox = 0; z_ox = 0
x_h1 = 10; y_h1 = 0; z_h1 = 0
x_h2 = 10*cos(104.5*pi/180); y_h2 = 10*sin(104.5*pi/180); z_h2 = 0


# Create the molecules
ren.AddActor( makeSphere(5, [x_ox, y_ox, z_ox], [1,0,0]) ) # Oxygen
ren.AddActor( makeSphere(2, [x_h1, y_h1, z_h1], [1,1,1]) ) # Hydrogen
ren.AddActor( makeSphere(2, [x_h2, y_h2, z_h2], [1,1,1]) ) # Hydrogen

# Create the connectors
ren.AddActor( makeCylinder(1, 10, [0, 5, 0], [0,0,1], [0,0,-90]) ) 
ren.AddActor( makeCylinder(1, 10, [0, 5, 0], [0,0,1], [0,0, 14.5]) ) 

# enable user interface interactor
iren.Initialize()

iren.Start()

Adding spheres on a grid ...

In this post, we shall look at the method of adding more than one sphere. The result is shown below:

Fig. 1.

The code for adding more spheres is shown in the program below. The only thing to notice is that, during the process of adding actors to the renderer, it is not necessary to store the information about the individual objects, such as the aforementioned vtk objects, or actors. You simply add individual polygons to the renderer, one after the other. The renderer remembers all the polygons and their properties that are added to it. This results in significant memory savings if there are a lot of objects to render.


#! /usr/bin/python
from vtk import *

# create a rendering window and renderer
ren = vtkRenderer()
renWin = vtkRenderWindow()
renWin.AddRenderer(ren)
renWin.SetSize(300,300)
renWin.StereoCapableWindowOn()

iren = vtkRenderWindowInteractor()
iren.SetRenderWindow(renWin)

# Create a number of spheres
for i in range(0, 160, 20):
for j in range(0, 160, 20):
for k in range(0, 160, 20):
# create the object to be drawn
sphere = vtkSphereSource()
sphere.SetRadius(2)
sphere.SetThetaResolution(30)
sphere.SetPhiResolution(30)
sphere.SetCenter(i, j, k)

# Convert the sphere into polygons
sphereMapper = vtkPolyDataMapper()
sphereMapper.SetInput(sphere.GetOutput())

#Create an actor for the sphere 
sphereActor = vtkActor()
sphereActor.SetMapper(sphereMapper)
(sphereActor.GetProperty()).SetColor(1 - k/160.0, 0  , k/160.0)
(sphereActor.GetProperty()).SetOpacity(k/200.0)

# assign our actor to the renderer
ren.AddActor(sphereActor)

# enable user interface interactor
iren.Initialize()

iren.Start()

Making a sphere using vtk


This post is going to explore the method for drawing shapes using vtk. Specifically a sphere. This builds upon the example of the cone by Gobbi. You should see the cone tutorial first, understand what it is doing, and then start on this tutorial. Three things will be introduced here.
  1. The vtkSphereSource class,
  2. Changing the way in which the sphere is created, and
  3. Changing the way in which the sphere is displayed.
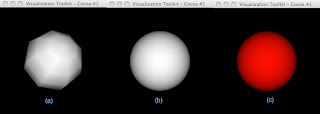
Before carrying on, it is proper to introduce visually the different properties that has been changed in each of the different steps. It is summarized in the picture below.
Fig. 1. The different spheres

1. The vtkSphereSource class:
The cone object from Gobii's example has been changed to the sphere with a radius of 8 using the vtkSphereSource class. This is the easy part. This is shown in Fig. 1(a). The code for doing this is shown below. The vtkSphereSource class uses the SetRadius() method to change the size of the sphere.

#! /usr/bin/python

from vtk import *


# create a rendering window and renderer

ren = vtkRenderer()

renWin = vtkRenderWindow()

renWin.AddRenderer(ren)

renWin.SetSize(300,300)

renWin.StereoCapableWindowOn()


iren = vtkRenderWindowInteractor()

iren.SetRenderWindow(renWin)


# create the object to be drawn

sphere = vtkSphereSource()

sphere.SetRadius(8)


# Convert the sphere into polygons

sphereMapper = vtkPolyDataMapper()

sphereMapper.SetInput(sphere.GetOutput())


#Create an actor for the sphere

sphereActor = vtkActor()

sphereActor.SetMapper(sphereMapper)


# assign our actor to the renderer

ren.AddActor(sphereActor)


# enable user interface interactor

iren.Initialize()


iren.Start()


2. Changing the way in which the sphere is created
Notice that the sphere is really approximated by a number of flat surfaces. This is because, the vtkSphereSource class, does not draw the sphere. It just creates a bunch of surfaces. Then, the mapper maps these into openGL objects. To make the sphere appear more like a sphere, and less like a three-dimensional polygon, you would want to increase the number of these surfaces. This is done, from within the vtkSphereSource class by adding the following lines after creating the vtkSphereSource class.

sphere.SetThetaResolution(30)

sphere.SetPhiResolution(30)


These change the number of discrete points along the theta and phi directions (spherical coordinates) to 30 each. This is shown in Fig. 1(b).

3. Changing the way in which the sphere is displayed
The actual rendering is done by the vtkActor class. One of the protected attributes of this class is Property, which is a vtkProperty class, that controls the color, opacity, interpolation, lighting, etc. To set the color to red for example, use the following code:

(sphereActor.GetProperty()).SetColor(1,0,0)


Note that you first need to get a pointer to the Property you need to set, before you can set it. The result is shown in Fig. 1(c).

The final code stands as:

#! /usr/bin/python

from vtk import *


# create a rendering window and renderer

ren = vtkRenderer()

renWin = vtkRenderWindow()

renWin.AddRenderer(ren)

renWin.SetSize(300,300)

renWin.StereoCapableWindowOn()


iren = vtkRenderWindowInteractor()

iren.SetRenderWindow(renWin)


# create the object to be drawn

sphere = vtkSphereSource()

sphere.SetRadius(8)

sphere.SetThetaResolution(30)

sphere.SetPhiResolution(30)


# Convert the sphere into polygons

sphereMapper = vtkPolyDataMapper()

sphereMapper.SetInput(sphere.GetOutput())


#Create an actor for the sphere

sphereActor = vtkActor()

sphereActor.SetMapper(sphereMapper)

(sphereActor.GetProperty()).SetColor(1,0,0)


# assign our actor to the renderer

ren.AddActor(sphereActor)


# enable user interface interactor

iren.Initialize()


iren.Start()


How to install vtk with python bindings on a Mac


Drew at MacResearch has an excellent article on installing vtk on the Mac. However, rather than use python bindings, he accesses vtk via its Cocoa bindings in C. I wanted to use Python bindings however, and it was kinda difficult to install. I shall write down everything I did differently, to install vtk using python bindings. Follow Drew's instructions, and you might want to modify them as below...

--------------------------------------------------------
1. Make sure that you have the right variables in CMakeCache.txt:

To Install the files in the right directory:
CMAKE_INSTALL_PREFIX:PATH=/Users/sankhamukherjee/Develop/VTKBin

Make the following changes for Python bindings:
BUILD_SHARED_LIBS:BOOL=ON
VTK_WRAP_PYTHON:BOOL=ON

I dont particularly care for Cocoa much, so I let the normal bindings be ...
-----------------------------------------

Turns out sudo doesn't accept the root password in the Mac terminal. To tell you the truth, I have no idea what the root password is. So, we cant install python bindings in the /usr/lib directories. I guess this is why we build the program in a VTKBin directory! Crappy alternative, but thats all that there is to offer. I work from the VTKBuild directory for the following commands.

Find your current python library folder (mine's in /usr/lib/python2.6). Create a python2.6 (if you have a different version of python, you would want to create a different directory) folder in the ../VTKBin/lib folder, and copy the entire contents here…

Then, within this directory, create a folder named site-packages.

Make sure that vtk knows where this is …
export PYTHONPATH=/Users/sankhamukherjee/Develop/VTKBin/lib/python2.6/site-packages

Then, compile and install the packages, like Drew.
----------------------------------------------------------------------

Reconfigure (create if needed) the .bash_profile file. Generally, I have seen that blindly imitating the .bash_profile file of someone else is not enough. You need to find the right information before you create the file. My file is shown below as an example.

Note the following:
Your LD_LIBRARY_PATH= the path where you find your .so files.
Your DYLD_LIBRARY_PATH= path where you find your .dyld files.
Your PYTHONPATH= the site-packages directory that you just created.
Your PATH= directory where you find the vtkpython executable.

# Set the path to the vtk libraries for python
export LD_LIBRARY_PATH=/Users/sankhamukherjee/Develop/VTKBin/lib/python2.6/site-packages/VTK-5.4.2-py2.6.egg/vtk:${LD_LIBRARY_PATH}
export DYLD_LIBRARY_PATH=/Users/sankhamukherjee/Develop/VTKBin/lib/vtk-5.4:${DYLD_LIBRARY_PATH}

# Set the python path to use the vtk module
export PYTHONPATH=/Users/sankhamukherjee/Develop/VTKBin/lib/python2.6/site-packages

# Set the path for the bin of the vtk
export PATH=/Users/sankhamukherjee/Develop/VTKBin/bin:$PATH


restart bash for good measure (i.e. do a [cmd]-q on the terminal and thenreopen it)

---------------------------------------------------------------

Run the following program from the website:

#! /usr/bin/python
from vtk import *

# create a rendering window and renderer
ren = vtkRenderer()
renWin = vtkRenderWindow()
renWin.AddRenderer(ren)
renWin.SetSize(300,300)
renWin.StereoCapableWindowOn()

iren = vtkRenderWindowInteractor()
iren.SetRenderWindow(renWin)

# create an actor and give it cone geometry
cone = vtkConeSource()
cone.SetResolution(8)
coneMapper = vtkPolyDataMapper()
coneMapper.SetInput(cone.GetOutput())
coneActor = vtkActor()
coneActor.SetMapper(coneMapper)

# assign our actor to the renderer
ren.AddActor(coneActor)

# enable user interface interactor
iren.Initialize()

iren.Start()